Toilet
Why Does My Toilet Keep Running After Flushing?
A running toilet may be caused by a leaking flapper, tangled chain, wrong float setting, misplaced refill tube, or worn fill valve. Find and fix it safely.
Quick answer
A toilet usually keeps running because the flapper or flush seal is leaking, the chain is too tight or tangled, the float is set too high, the refill tube is positioned incorrectly, or the fill valve is no longer shutting off. First remove the tank lid and determine whether water is flowing into the overflow tube or leaking quietly into the bowl.
- Water flowing into the overflow tube usually points toward the float or fill valve.
- Water leaking into the bowl while the tank appears full usually points toward the flapper, canister seal, chain, or flush-valve seat.
- Brief refills every few minutes usually indicate a slow tank-to-bowl leak. See the related guide to a toilet tank that loses water without a visible external leak.
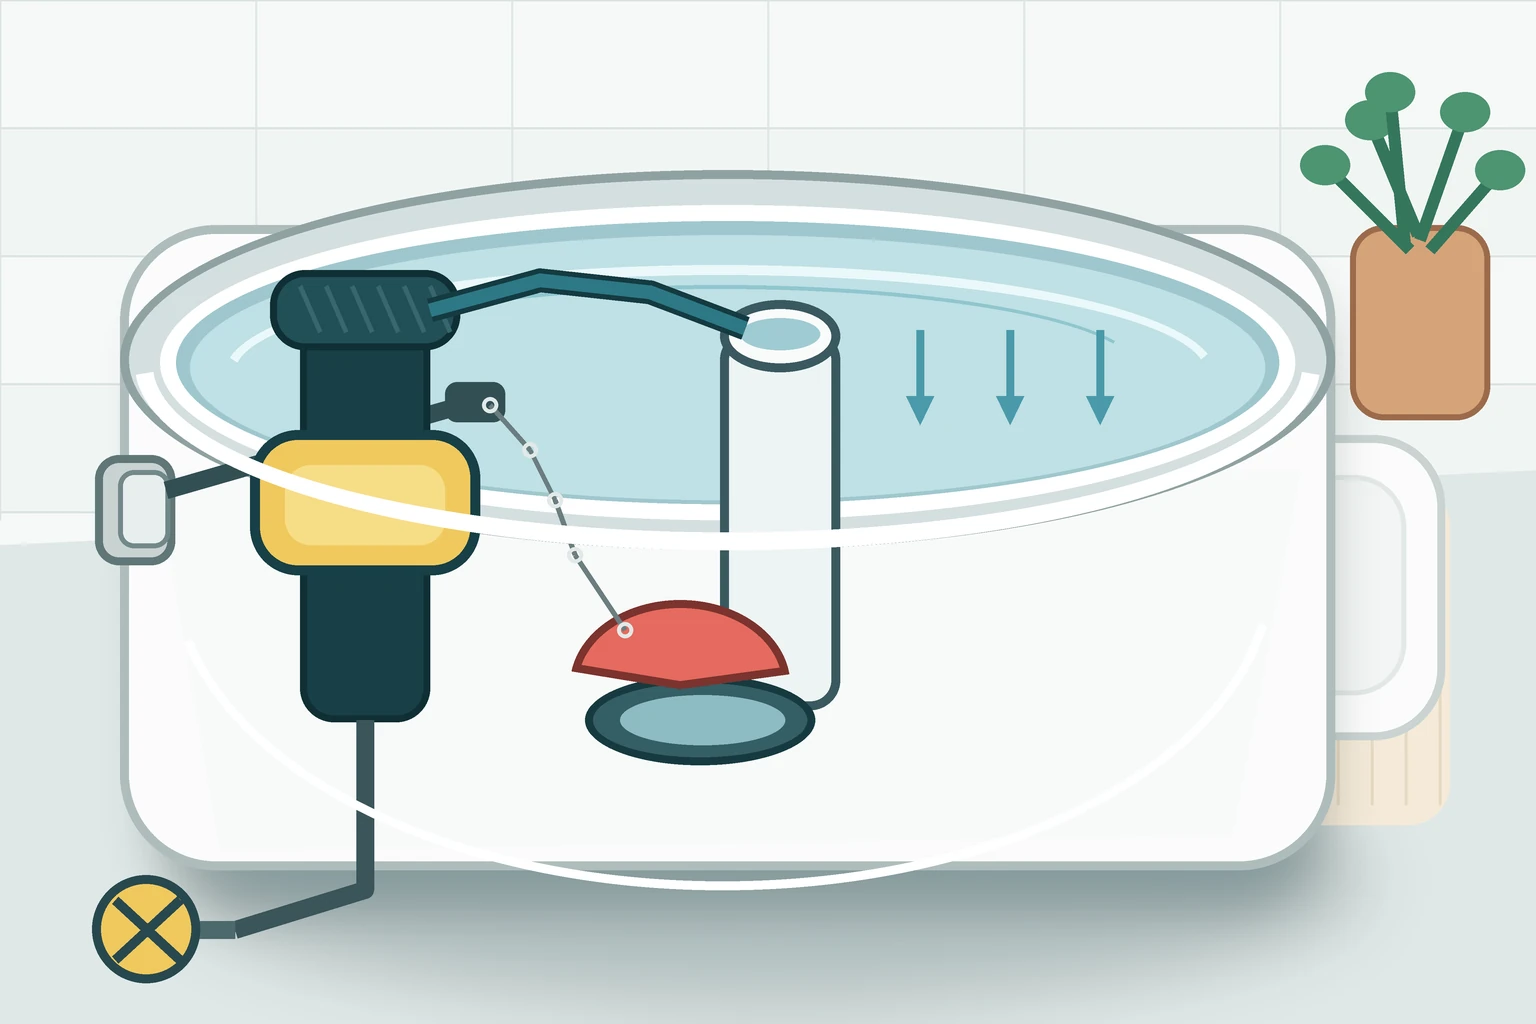
About the featured illustration: It shows one common float-cup arrangement in a gravity-flush tank. Some toilets use a float ball, and others use a canister or dual-flush tower instead of a flapper. Match your diagnosis and replacement part to the equipment actually in your tank.
Before opening the tank
Prepare a clear, dry work area before touching anything inside the tank:
- Remove the tank lid carefully with both hands.
- Place it flat on a towel where it cannot be knocked or stepped on.
- Keep cleaners, tablets, and loose objects out of the tank.
- Locate the toilet shutoff valve before beginning.
- Do not force a valve that is stuck, corroded, dripping, or difficult to turn.
- Do not use in-tank cleaner tablets while performing a dye test.
- Avoid leaning tools against the tank or bowl.
Porcelain tank lids can crack easily and may be expensive or difficult to replace, especially on an older or discontinued toilet. A chipped or cracked tank is not a place to experiment with tightening or repair.
Identify the symptom
Flush once with the lid removed and watch what happens. The table separates the visible clue from the first reasonable check and the point where a homeowner should stop.
| What you notice | Most likely cause | Safe first check | Possible repair | Stop point |
|---|---|---|---|---|
| Water continuously enters the overflow tube | Float set too high, float binding, or fill valve failing to shut off | Watch whether the float rises freely and compare the waterline with the tank mark and overflow-tube top. | Use the exact fill-valve or toilet instructions to correct the setting; clean or replace an identified fill valve only as its manufacturer directs. | Do not operate a stuck, corroded, or dripping shutoff. Stop if the equipment is unidentified or pressure-assisted. |
| Tank is full, but water trickles into the bowl | Flapper, canister seal, chain, or flush-valve seat not sealing | Check for a trapped chain, inspect the seal, and perform the dye test below. | Reposition the chain, gently clean the sealing surfaces, or install a verified compatible flapper or seal. | Stop for a cracked or damaged flush-valve seat, leaking tank bolts, or a leaking tank-to-bowl gasket. |
| Toilet stops running when the handle is jiggled | Handle, trip lever, or chain is sticking or misaligned | Watch whether the handle returns, the lever scrapes the tank, or the chain pulls sideways. | Untangle or reposition the chain; replace a compatible handle or lever if the part is clearly identified. | Do not overtighten plastic hardware or force corroded parts against porcelain. |
| Toilet refills briefly every few minutes | Slow tank-to-bowl leak through a flapper, canister seal, or flush-valve area | Run the 10-minute dye test without flushing. | Clean the sealing surface or install the correct seal after confirming the design and part number. | Stop if the seat is damaged, the leak is external, or the toilet uses an unfamiliar specialty system. |
| Hissing continues after the tank fills | Fill valve not shutting off, float binding, or water continuing toward the overflow | Observe the float and waterline; do not disassemble the valve while the supply is on. | Follow the identified valve manufacturer's cleaning or replacement instructions. | Call a plumber if the shutoff is unsafe or supply pressure or behavior appears abnormal. |
| Flapper closes too quickly | Chain too loose, chain connected in the wrong position, or incompatible/incorrectly adjusted flapper | Watch the flapper through a complete flush and check for tangling or excess slack. | Adjust one chain link at a time and use only the settings provided for the exact flapper. | Stop if the toilet uses a canister, tower, dual-flush, or other mechanism that does not match a basic flapper procedure. |
| Tank water level is too low | Incorrect float setting, refill tube inserted too far and siphoning, slow supply, or fill-valve fault | Find the tank's waterline mark, check float movement, and confirm the refill tube is clipped as intended. | Use the model-specific adjustment method or address an identified refill-tube or fill-valve issue. | Stop for an unsafe shutoff, external leak, unusually slow supply, or unexplained whole-home supply change. |
| Dual-flush button or tower sticks | Button, cable, tower, or manufacturer-specific seal is binding | Identify the brand and model; observe ordinary button and tower movement without forcing it. | Use the manufacturer-specified button, cable, cartridge, tower, or seal procedure. | Do not force or dismantle an unfamiliar tower. Stop if parts are cracked or the correct procedure cannot be confirmed. |
| Water appears outside the tank | Supply connection, tank bolt, tank-to-bowl gasket, cracked porcelain, or condensation | Blot the area dry and observe where moisture first returns without moving or tightening the tank. | This guide does not cover supply connections, tank bolts, gaskets, or cracked porcelain; arrange proper diagnosis. | Stop using the toilet if water is spreading or damaging nearby materials. Never tighten cracked porcelain. |
| Toilet rocks or the floor feels soft | Loose or damaged mounting, failed base seal, flange problem, or subfloor damage | Do not rock the toilet further. Note the movement, odor, moisture, and floor condition. | Professional inspection may require toilet removal and floor or flange evaluation. | Stop using the fixture when leakage or floor damage is suspected. Do not tighten the toilet blindly against the floor. |
A safe diagnostic process
- Remove the tank lid and flush once.
- Watch whether the flapper lifts and reseats.
- Check whether the chain tangles, pulls tight, or catches under the flapper.
- Observe whether the float rises freely.
- Check whether water reaches or enters the overflow tube.
- Listen for hissing after the tank reaches its normal level.
- With the tank full, perform the 10-minute dye test without flushing when the cause is not obvious.
- Record whether dye reached the bowl and whether water continued toward the overflow tube. Operate the shutoff only if a subsequent basic repair requires it and the valve turns normally and remains dry.
The 10-minute dye test
- Make sure the bowl and tank are not colored by cleaning products.
- Add a few drops of food coloring to the tank, not the bowl.
- Wait 10 minutes without flushing.
- If colored water appears in the bowl, water is leaking through the flapper, canister seal, or flush-valve area.
- Flush immediately afterward to reduce the risk of staining.
A positive test confirms tank-to-bowl leakage, but it does not identify the exact replacement part. These timing and flush-after instructions follow EPA WaterSense leak-check guidance.
Why a running toilet should not be ignored
EPA WaterSense reports that the average household's leaks can waste more than 9,300 gallons of water each year and identifies worn toilet flappers among common household leak sources. Water loss varies widely by fault, so use your actual meter, utility rate, and leak condition rather than a universal dollar estimate. See EPA WaterSense: Fix a Leak Week and PlumbAdvisor's guide to running-toilet water waste.
How the toilet tank parts work
In a basic gravity-flush toilet, the handle moves the flush lever, the lever pulls the chain, and the chain lifts the flapper from the flush-valve opening. Water leaves the tank for the bowl. As the tank empties, the float drops and the fill valve opens. The flapper then reseats, the fill valve refills the tank, and the refill tube sends water toward the overflow tube to restore the bowl's normal level. The fill valve should stop when the float reaches the model's intended waterline. For more background, see how a toilet works.
- Handle
- The outside control you press to start a flush.
- Flush lever
- The arm inside the tank that converts handle movement into an upward pull.
- Chain
- Connects the lever to a flapper or other lift mechanism. It needs enough slack for the seal to close, but not enough to tangle.
- Flapper or flush seal
- Closes the tank-to-bowl water path between flushes. Canister and tower toilets use a seal with a different shape.
- Flush-valve opening
- The opening through which tank water enters the bowl. A rough, cracked, or damaged seat can prevent a new seal from working.
- Overflow tube
- Provides a path to the bowl if the tank water rises too high and usually receives refill water for the bowl.
- Refill tube
- Directs a controlled stream toward the overflow tube during refill. It should be positioned according to the fill-valve instructions.
- Fill valve
- Opens after a flush to refill the tank and closes at the intended waterline.
- Float cup or float ball
- Rises with the tank water and signals the fill valve to close. It must move freely.
- Waterline
- The manufacturer's intended tank level, often marked inside the tank. It is not one universal distance for every toilet.
- Supply line
- Carries water from the shutoff valve to the tank. External leaks are outside the scope of this repair guide.
- Shutoff valve
- Isolates the toilet supply when it operates normally. Do not force one that is stuck, corroded, or leaking.
Safe fixes to try
These steps are for an ordinary gravity-flush toilet with visible, identifiable parts. Stop if the design differs, the shutoff is unsafe, water appears outside the tank, or porcelain or mounting parts are damaged.
1. Reposition or untangle the chain
- The chain should have a small amount of slack when the flapper is closed.
- It should not be tight enough to lift the flapper from its seat.
- It should not be so loose that it tangles, catches under the flapper, or snags another part.
- Move the connection only one link at a time.
- Test several flushes after each adjustment and confirm that the handle returns and the flapper sits flat.
There is no single chain measurement for every flapper and lever. Use the instructions for the installed part when they specify a connection point or setting.
2. Clean the flapper and flush-valve seat
- Shut off the toilet only if the valve turns normally and remains dry.
- Flush to lower the tank water.
- Lift the flapper without stretching or twisting it.
- Wipe away loose sediment or slime from the flapper and seat with a soft cloth.
- Inspect the contact surface for roughness, cracks, distortion, or damage.
- Restore water and repeat the dye test if the surfaces look sound.
Do not use abrasive pads, scraping tools, harsh chemicals, petroleum products, or anything that can scratch the seat or damage the rubber. Cleaning can remove loose residue; it cannot restore hardened, warped, cracked, or chemically deteriorated material.
3. Identify a worn flapper
Replacement is more likely when the flapper shows cracking, warping, hardening, slimy deterioration, missing or damaged mounting ears, or repeated failure to sit flat. A new flapper that has the wrong diameter, contour, float, timing adjustment, or mounting style may also leak. A package marked “universal” does not guarantee a fit for every toilet.
4. Replace a basic flapper
This concise process applies only to a standard gravity-flush toilet with a conventional flapper and accessible mounting ears:
- Photograph the existing setup before moving the chain.
- Record the toilet brand and tank model number.
- Shut off the water only when the valve is safe to operate.
- Flush and remove the small amount of remaining tank water as needed.
- Disconnect the chain from the lever.
- Remove the flapper from its mounting points without forcing the flush valve.
- Install a replacement verified for the toilet and flush-valve design.
- Reconnect the chain with slight slack.
- Restore water and test several flushes, then repeat the dye test.
See the manufacturer's exact procedure before starting. This process does not apply to every canister, tower, dual-flush, pressure-assist, or specialty toilet. Korky's manufacturer flapper-replacement guide also emphasizes confirming the correct fit before installation.
5. Correct refill-tube position
The refill tube normally clips near the top of the overflow tube or connects in another manufacturer-specified way. It should not be shoved deeply down into the overflow tube. Incorrect placement can contribute to siphoning or abnormal refill behavior. Follow the fill-valve manufacturer's instructions for the specific model; tower-style systems may use a different attachment.
6. Check float movement and water level
A float cup should travel freely on or beside the fill-valve body. A float ball should rise without rubbing the tank wall, lid, refill tube, or lever. Flush once and watch for sticking throughout the refill.
The normal waterline is often marked inside the tank. Water should generally shut off below the top of the overflow tube, but the correct setting belongs to the toilet or fill-valve manufacturer. Do not bend a rod or turn an adjustment screw until you have identified the equipment and found its adjustment method. For additional comparison points, see how much water should be in a toilet tank.
7. Inspect the fill valve
A fill-valve problem is more likely when you notice hissing after refill, failure to shut off, a sticking float, very slow refill, intermittent operation, or water continuing into the overflow tube after the float rises.
Some fill valves can be cleaned or serviced according to the exact model-specific installation document; others are better replaced. Do not disassemble an unidentified valve while it is under pressure. If the tank fills very slowly, use the separate slow-filling toilet checks before assuming that one part is at fault.
8. Check the handle and trip lever
- The handle should return freely after flushing.
- The lever should not scrape the tank wall, lid, refill tube, or float.
- The chain should lift mostly upward rather than pulling the flapper sideways.
- Many handle retaining nuts use reverse threads, so identify the part and read its instructions before loosening it.
- Plastic hardware can crack if overtightened.
If the handle is loose, sticking, or damaged, see the guide to checking a loose or broken toilet handle safely.
Model-specific part compatibility
Before ordering or visiting a store, collect:
- Toilet brand
- Tank model number
- A photo of the complete tank interior
- Flush-valve diameter when relevant
- Existing flapper or seal style
- Fill-valve brand and model
- Old part number
- Single-flush or dual-flush design
- Gravity-fed or pressure-assist design
The tank and bowl can have different model numbers. Search the toilet manufacturer's parts diagram or support system using the tank number, then confirm dimensions and attachment style. Do not assume a part fits merely because it is sold as universal.
Special toilet designs
- Canister or tower flush valves: These usually need a manufacturer-specific seal and a procedure that differs from a hinged flapper.
- Dual-flush toilets: Buttons, cables, towers, cartridges, and seals vary. Identify the exact model before adjusting or ordering parts.
- Pressure-assist toilets: The tank contains a sealed pressure vessel rather than an ordinary open gravity system. Do not open, disassemble, adjust, or service the pressure vessel from this general guide. Use the exact manufacturer support channel or contact a qualified plumber.
- Wall-hung or concealed-tank toilets: Service access, valves, carriers, and flush mechanisms may be behind a panel or wall. Do not enlarge openings or disturb the carrier from a general article.
- Specialty or discontinued toilets: They may require exact seals, cartridges, buttons, towers, or old-stock parts. Compare the tank number and parts diagram rather than modifying a near-match.
For pressure-assist equipment, start with the Flushmate manufacturer resource library or the support material for the brand installed in the toilet.
When to call a plumber
Frequently asked questions
Why does my toilet keep running until I jiggle the handle?
The handle may not return fully, the trip lever may be rubbing the tank, or the chain may be tight, tangled, or pulling sideways. Watch the mechanism with the lid off. Correct the chain only if the parts are identifiable; replace a damaged handle with a compatible part.
Why does my toilet run every few minutes?
The tank is probably losing water slowly into the bowl, causing the fill valve to top it up again. A 10-minute dye test can confirm tank-to-bowl leakage. A positive result does not by itself tell you whether the flapper, canister seal, or flush-valve seat is responsible.
How can I tell whether the flapper is leaking?
Check whether it sits flat, look for damage, and perform the dye test without flushing. Color in the bowl after 10 minutes confirms a leak through the tank-to-bowl path, but you still need to inspect the seal, chain, and seat.
Can I clean a toilet flapper instead of replacing it?
You can gently wipe loose slime or sediment from the flapper and seat with a soft cloth. Cleaning may help when residue is the only problem. Replace the correct part when the rubber is cracked, warped, hardened, deteriorated, or no longer sits flat.
How do I know whether the fill valve is bad?
Likely signs include hissing after the normal refill, failure to shut off, a float that sticks, very slow or intermittent refill, or continued water flow into the overflow tube after the float has risen. Confirm float movement and the intended waterline before replacing the valve.
Should water enter the overflow tube?
A small stream from the refill tube normally enters or is directed toward the overflow tube while the tank refills so the bowl returns to its intended level. Tank water should not continuously spill over the top after refill; that points toward a float or fill-valve problem.
How much slack should the toilet chain have?
Enough for the flapper to close and sit flat, but not enough to tangle or catch beneath it. Adjust one link at a time and test several flushes. Use the flapper or toilet manufacturer's setting when one is provided.
Are toilet flappers universal?
No. Flush-valve diameter, seat shape, mounting style, timing features, and toilet-specific designs vary. Even products sold as universal have limits. Match the tank model and flush-valve design before buying.
Why does my new flapper still leak?
It may be the wrong size or shape, the chain may be tight or trapped, residue may remain on the seat, or the flush-valve seat may be rough, cracked, or damaged. Do not keep stacking parts or using sealants to compensate for a damaged seat.
Can a running toilet increase my water bill?
Yes. The amount depends on the leak rate and local water and sewer charges. Use the actual meter and utility rate rather than a universal cost estimate, and address the leak promptly.
When should I replace the whole toilet instead of repairing it?
Consider replacement when the porcelain is cracked, the toilet remains unstable, a discontinued mechanism has no reliable parts, repeated compatible repairs fail, or removal is already needed for a base, flange, or floor problem. A plumber can compare repair feasibility with replacement. See toilet replacement clues homeowners can track and EPA WaterSense residential-toilet guidance if water efficiency is part of the replacement decision.
Sources
Citations are placed beside the dye-test and water-waste claims they support. The following primary and manufacturer sources were checked for the broader mechanical and compatibility guidance. See also the PlumbAdvisor source library.
- U.S. EPA WaterSense, “Fix a Leak Week” — household leak figures, worn flappers, and the 10-minute food-coloring test; accessed July 14, 2026.
- U.S. EPA WaterSense, “Residential Toilets” — water-efficiency context for a replacement decision; accessed July 14, 2026.
- Korky, “How a Toilet Works — Anatomy of a Toilet” — gravity-tank component functions and flapper/canister distinctions; accessed July 14, 2026.
- Korky, “How to Replace Toilet Flapper” — compatibility, sealing-surface cleaning, and a basic flapper workflow; accessed July 14, 2026.
- Korky, “How to Replace Toilet Fill Valve” — model-specific valve height and refill-tube attachment examples; accessed July 14, 2026.
- Korky, “How to Replace a Toilet Handle” — handle return, mounting position, and reverse-threaded retaining-nut guidance; accessed July 14, 2026.
- Kohler Customer Service and Product Support — product identification, service parts, and technical specifications; accessed July 14, 2026.
- Flushmate Resources — manufacturer support for pressure-assist systems; accessed July 14, 2026.
Decision aid: Why Does My Toilet Keep Running After Flushing
Start by identifying the relevant symptom, fixture, or planning question before choosing parts or arranging work.
Write down when the issue began, what changed, which fixtures are affected, and any model or service-history details. That record makes it easier to compare the article with the exact product documentation and to explain the problem if qualified help is needed.
- Confirm the toilet model, whether the symptom occurs during refill or flushing, and whether water is visible outside the bowl or tank.
- Match product-specific directions to the exact model manual and confirm local requirements where installation, gas, electricity, water quality, or structural work is involved.
- Stop if the toilet rocks, leaks at the base, the shutoff is stuck, or more than one fixture backs up.
Authoritative references for this topic
Use the current version of these sources to verify safety, efficiency, health, or product-specific details that apply to your situation.